 |
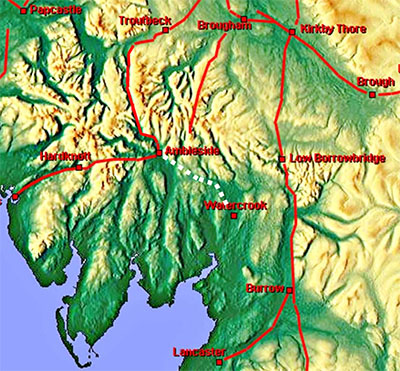
The Roman Road from Watercrook to Ambleside, Margary 70fA road that Margary strangely did not include in his book. If he had he would probably have numbered it 70f. I have shown the route dotted on the location plan and over much of the images here. There is no doubt regarding its existence but the precise location is still somewhat vague around Staveley but its general course is perhaps now determined. Topography dictates they would have not have followed a purely direct road but gone via the Staveley valley and the evidence we have confirms this. The lack of inclusion in Margary's book has not stopped speculation over the years as to its course. Probably the most recent attempts to trace the road were by Arthur Thornton (C&WAAS 1989) and JS & JA Andrews (C&WAAS 1991&92), the latter using the (controversial?) technique of dowsing. For the former there were some Lidar traces but not ones I would consider as sufficiently convincing. Regarding the Andrews route(s) - they found many variations - and, because I was very sceptical of dowsing, I did my searching of Lidar data before re-consulting their articles. The route I independently found from Kendal to Staveley is very similar (but not identical) to what they suggested. Beyond Staveley then routes diverge and their suggestion taking it over the sides slopes of Reston Scar appears somewhat implausible. Also suggested in the past by both the above sources, is a fort near Broadgate but as we shall see, Lidar does not support that - but more on this later.
|
3D Lidar Image - Watercrook Fort The urban sprawl of Kendal means that locating the initial course of the road is all but impossible now. There is perhaps the faintest trace of a road heading out of the north-west gate of the fort but the first real clue is at Stainbank Green - the name itself is a bit of a clue. |
Click for larger view |
 |
Lidar Image and Route Map - Watercrook to Staveley The area around Stainbank Green is where we can first be definite about the road. North of Underbarrow Road and the quarry, then the Roman agger becomes very clear and certain both south and north of Kendal Bypass. There is also enough intermittent traces beyond Plumgarths and the B5284 to establish the line, which eventually merges with the A591 heading for Staveley. |
Click for larger view |
 |
Lidar Image and Map - Stainbank Green Thanks to local detective work by Tom Barkas we can now be reasonably confident of the route at Stainbank Green. There is a popular footpath south of Brigsteer Road and the agger can be seen from it alongside the hedgeline - see below. The road first shows as a cutting emerging from the housing estate. This aligns well with the next section at Stainbank Green and is typical of how the Romans reduced steep climbs. |
Click for larger view |
 |
Looking North towards Stainbank Green The agger is very prominent alonside the hedgeline. Soil creep down the slope has reduced the width of agger visible but it is still clear what a large construction it was. The popular footpath can be seen in the distance coming in from the right up from Stainbank Road. Image: Tom Barkas with his dog, Bruach, just getting into the view! |
Click for larger view |
 |
Agger towards Stainbank Green On the low (east) side of the agger are a line of substantial stones - probably a revetment rather than just kerb stones. This is typical Roman engineering for dealing with side sloping ground. Image: Tom Barkas |
Click for larger view |
 |
North of Brigsteer Road The farm track heading north of Brigsteer Road towards the quarries has the necessary characteristics and represents the most practical way ahead. It is straight and beyond the first wall then it is on a large agger. As pointed out by Tom Barkas, this this the best route to cross the ravine here. Any lower down the hill (east) then it becomes much more of an obstacle. The farm track is relatively modern - it doesn't appear on old maps - and took the easy option of using the Roman agger as its foundation. Image: Tom Barkas |
Click for larger view |
 |
3D Lidar Image - Cunswick Fell This is the real clincher for the initial line of the Road with a very obvious agger heading towards the modern bypass road. It is even clearer in the DTM version but not as realistic! The rocky Lake District terrain makes it clear why they headed for an easier route via Staveley. Why fight all the rock outcrops? It is surely no coincidence that both the railway and modern day highway heading for the Lakes take the same general route. |
Click for larger view |
 |
Roman Road passing Boundary Bank Farm This is looking back towards Watercrook. Boundary Bank farm is to the right and this spot is before the alignment crosses Kendal Bypass..Bruach is studying the road. The wall in the distance by the trees humps over what must be the agger. Field boundaries and hedgelines are often where the agger survives best. Image: Tom Barkas |
Click for larger view |
 |
Roman Road near Helsfell Farm We are looking north towards Plumgarths. The agger is all but gone but the course is very obvious with the grass having lighter shade of green. This is the same straight alignment from Boundary Bank but we have now crossed Kendal Bypass. Image: Tom Barkas |
Click for larger view |
 |
Agger near Lanehead Kennels. The agger of the Roman road has survived well in the corner of the field just before the alignment merges into the modern A591 at Lanehead Kennels. Beyond here tracing the road across Staveley becomes much more difficult. Image: Tom Barkas |
Click for larger view |
 |
|
NEW - 3D Lidar video fly-over along the road from Watercrook to Staveley. |
||
Lidar Image and Route Map - Staveley Not a lot of evidence across Staveley but the Roman line must be close to the former A591. Note: there is an underground pipeline across Staveley which provides several false clues! |
Click for larger view |
 |
3D Lidar Image - Broadgate This stretch heading past the west side of Broadgate came as a complete surprise to me. I had always assumed that the modern country lane from Ings over Mislet Brow was probably the line so this alignment of what appears to be classic Roman alignments was a shock. Warning: in the vicinity is the Thirlmere Aqueduct which can give false clues! It crosses the Trout Beck at Thickholme Bridge. |
Click for larger view |
 |
Lidar Image and Route Map - Broadgate to Troutbeck Beyond Mislet, the Lidar alignment merges in with the modern lane and heads for the Troutbeck valley. To get across the Trout Beck it would appear that Town End Footbridge must be close or on the Roman line as this is still one of the best places to get across this deep valley. There are twin bridges and one was swept away in the floods of Storm Desmond. It should have been replaced by now. S.S. Frere (Britannia, 1982, P292) suggests this as the crossing point too. |
Click for larger view |
 |
3D Lidar Image - Supposed Broadgate Fort Without much supporting evidence this "fort" has almost been accepted by default. On the basis of the Lidar data then it has no real Roman characteristics and just appears to be a chance arrangement of field boundaries. The long straight field boundary to its right is interesting though - enclosure act I assume. |
Click for larger view |
 |
Lidar Image - Troutbeck to Ambleside The last run into Ambleside might seem strange compared to the easy route the modern A591 takes but is much more direct and the Romans must have decided that the distance saved was worth the climbing. In the 3D view (below) it looks much more logical. For the map of this stretch see below. |
Click for larger view |
 |
Holbeck Lane - zig-zag descent to Briery Close Very typical Roman zig-zags descending towards Briery Close. These are the zig-zags visible in the 3D Lidar image below. Image: Google Earth |
Click for larger view |
 |
Route Map - Troutbeck to Ambleside When plotted out the route is reasonably obvious - much more so than the oft suggested alternative via High Skelghyll. Map: Bing Maps
|
Click for larger view |
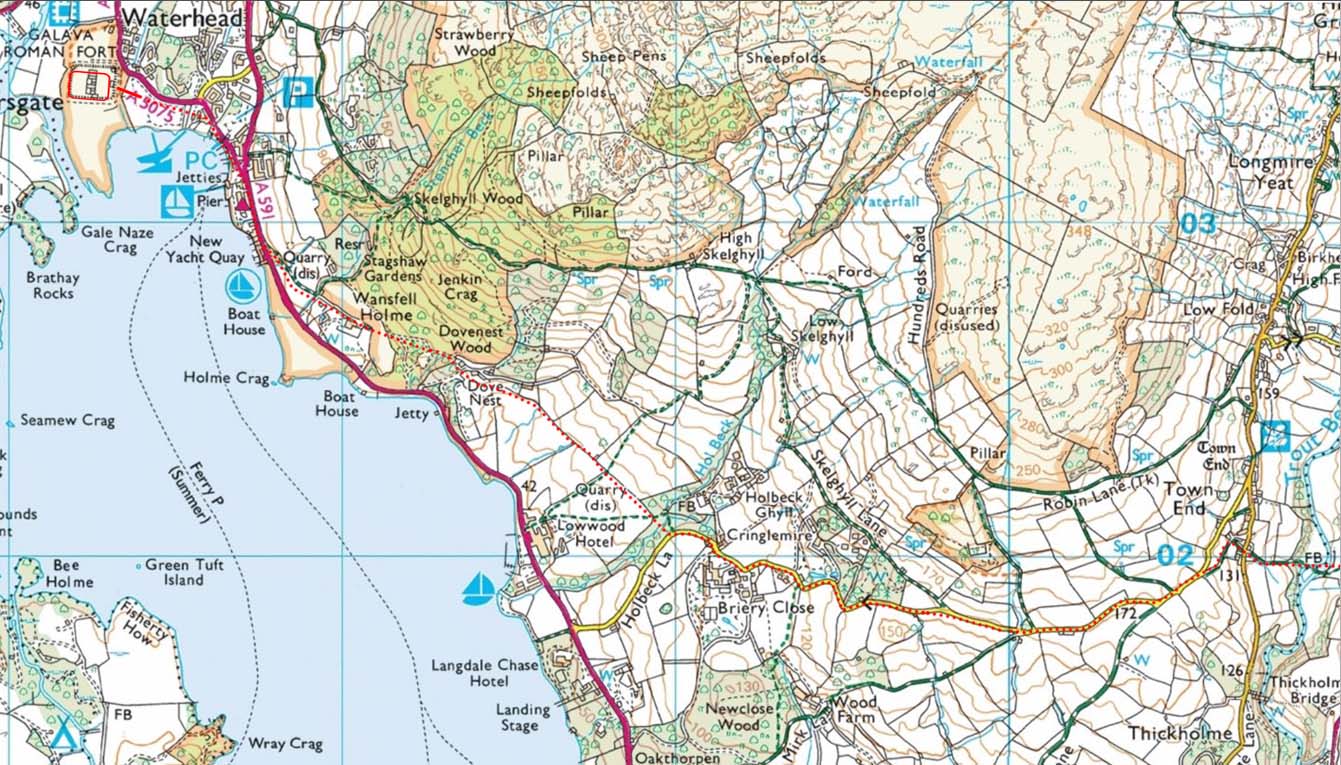 |
3D Lidar Image - Road down to Ambleside It was seeing this view that convinced me the route from Ambleside to Troutbeck via Wansfell Holme, Dove Nest and Holbeck Lane was definitely the Roman line. It has all the characteristics and was obviously a short cut worthy of the climb. |
Click for larger view |
 |
Full Route Map I think we now have a route with reasonable confidence for what must have been a strategic link road providing connections via Ambleside to the north via Dunmail Raise (Margary 741) or west to Ravenglass (Margary 740). |
Click for larger view |
 |
|
|
|
Return to Cumbria Roman Roads homepage Last update December 2018 |
© David Ratledge |